
6 Non-obvious Flutter and Dart Packages


Last article update: October 2023
There are tens of thousands of packages on Dart’s language main package site - pub.dev, and many are released and updated daily. Novice developers sometimes feel guilty about using a package rather than coding what it provides, but there’s nothing to worry about.
Almost every production-grade app depends on tens of packages. Using packages lets us quickly implement standard functionalities and focus more on what makes every app unique.
In our apps, we like to keep the number of packages we depend on to a sensible minimum because every new dependency may be another possible point of failure. But we also like experimenting with new packages, and when we find one that is reliable and makes our work easier – we use it!
In this article, we look closely at 6 small, useful, but not-so-popular Dart and Flutter packages. Moreover, all of them are made and tested by LeanCode's Flutter developers, so we are sure you can rely on them.
Our top 6 Dart and Flutter and packages
Each package usually started as a class or two in a project, and once they proved helpful, they were copied over to new projects. Eventually, someone with an open-source mindset extracted them to a separate repository, added documentation, and shared them with the world!
1. Package comms
The comms package is a type-safe and more flexible alternative to the event_bus package.
Problem
Very often, we need to communicate between two components of an application. For example, we might have two blocs, with the first one being above the second one.
└── App
   └── FirstBloc
        └── SecondBloc
Facilitating unidirectional communication from FirstBloc to SecondBloc is easy to do – just pass FirstBloc to SecondBlocs constructor. But what if our case is more complex, and we need bidirectional communication between these 2 blocs?
For some time, we used the event_bus package to do this. event_bus claims to reduce coupling between application components.
In our experience, unfortunately, using event_bus doesn’t help to solve this situation. Coupling is still there, but the dependency becomes hidden, which is actually even worse.
We needed something better, and here enters the comms package!
Solution
The comms package is really simple. It has only 2 structures: a Sender mixin and a Listener mixin. Once you mix one of them in your class, you’ll give it the ability to send and receive messages.
Let’s assume that you have a FooWorker class, which crunches some numbers, and the result of that number crunching is a Uint8List, wrapped in some FooData class:
class FooData {
  FooData(this.data, this.generatedAt);

  final Uint8List data;
  final DateTime generatedAt;
}

class FooWorker {
  Future<FooData> doWork() async {
    // do some work
  }
}
Now imagine that there’s also some FooConsumer, which is interested in getting that data.
class FooConsumer {
  // wants to perform some action when FooData from Worker becomes available
}
Of course, there are myriad ways to accomplish this, but I will do this with comms since that’s what we’re talking about. You only have to do 2 things!
First, let’s mix in Sender on our FooWorker and use the send method that Sender mixin provides to propagate our data:
class FooWorker with Sender<FooData> {
  Future<FooData> doWork() async {
    // do some work
   final data = Uint8List.fromList([1, 2, 3];
   final now = DateTime.now();
   send(FooData(data, now));
  }
}
The second and last step is to mix in Listener on our FooConsumer :
class FooConsumer with Listener<FooData> {
  @override
  void onMessage(FooData message) {
   // do whatever you want with the message once it becomes available
  }
}
And that’s all! Whenever someone calls doWork() on FooWorker, the data will be propagated to every class that is mixed with Listener<FooData>.
A nice property of comms is that senders and listeners don’t know anything about each other. This makes it easy to find places that can send or receive objects of a specific type and makes the whole app less coupled. And we maintain strong typing – no more dynamics. Just awesome!
It’s also worth noting that the comms package doesn’t depend on Flutter - you’re free to use it in your command-line tool or a backend service based on, for example, dart_frog.
And if you are indeed building a Flutter app, then there’s the flutter_comms package that extends comms with Flutter-specific functionality.
2. Package dispose_scope
The dispose_scope package helps you keep track of your resources and dispose of them when they’re no longer needed.
Problem
Let’s say that you’re writing a command-line app in Dart code, and you’re starting some subprocesses with the dart:io library.
Future<void> main() async {
  final proc = await Process.start('adb', ['forward', 'tcp:8081', 'tcp:8081']);
  final file = await File('config.yaml').open();

  // doing useful things
}
It’s always a good practice to clean up after ourselves by closing the opened file descriptors. Also, subprocesses don’t die when their parent dies, so we take care of that as well.
Future<void> main() async {
  final proc = await Process.start('adb', ['forward', 'tcp:8081', 'tcp:8081']);
  final file = await File('config.yaml').open();

  // doing useful things

  proc.kill();
  await file.close();
}
The above code is fine, but only because our example is really tiny! Now imagine that it’s a real CLI app that consists of a few dozen of Dart files, has a few layers of subcommands, starts subprocesses at different times, and acquires a bunch of other resources. Suddenly disposing of what we acquire becomes annoying and fragile.
That’s where the dispose_scope package comes into the picture. It makes it possible to acquire the resource and register it for disposal in the same place, thus freeing you from remembering about this. With the help of dispose_scope, the above example could be rewritten to:
import 'package:dispose_scope/dispose_scope.dart';

Future<void> main() async {
  final disposeScope = DisposeScope();

  final proc = await Process.start('adb', ['forward', 'tcp:8081', 'tcp:8081']);
  disposeScope.addDispose(() async => proc.kill());

  final file = await File('config.yaml').open();
  disposeScope.addDispose(() async => file.close());

  // doing useful things

  await disposeScope.dispose();
}
Wait, what has just happened? Let’s go over the new lines step by step.
First, we’re creating our dispose scope object.
final disposeScope = DisposeScope();Then we open a file descriptor, and we tell the dispose scope again how to dispose of our resource (the file descriptor) when we tell it to.
final file = await File('config.yaml').open();
disposeScope.addDispose(() async => file.close());
So far, we’ve added 2 callbacks to the dispose scope.
When we’re done with the important stuff and want to free the resources, we have to call dispose() on the dispose scope. This method calls the callbacks we’ve earlier added with addDispose. The resources get disposed of, and that’s it!
await disposeScope.dispose();This was just a simple example, but I hope that you can see how it can be useful in bigger projects. Dispose scope is a very simple yet flexible solution.
It’s good to know that you can have child dispose scopes, which can get disposed by some parent dispose scope. That’s a useful feature when your project gets bigger and more complex.
If you are using the Flutter mobile framework, then there’s flutter_dispose_scope which comes with a bunch of Flutter-specific goodies. There’s also bloc_dispose_scope, which seamlessly integrates DisposeScope with Blocs and Cubits.
3. Package bloc_presentation
The bloc_presentation package extends Blocs and Cubits with a separate stream for one-off events.
Problem
We love the bloc package. At LeanCode, it’s the standard state management library you’ll find in all our apps. It’s simple by default and powerful when needed.
Unfortunately, we found out that sometimes Events and States are not enough to represent the app’s behavior. We were not alone in this. Sometimes, we’d like to fire a one-off event, which shows a toast or snackbar. Since the result of such an event is only visible for a few seconds, we don’t want to store it in the bloc’s state - it feels wrong.
Our solution to this is the bloc_presentation package.
Solution
bloc_presentation provides the BlocPresentationMixin, which you mix in on your Cubit or Bloc to add an additional stream to it – the presentation stream. The presentation stream is used to dispatch one-off events we talked about earlier.
Imagine that we’re building out a login form and want to show a snackbar when the user enters the wrong credentials or when they don’t have internet access.
Let’s assume that we already have a simple SignInCubit:
class SignInCubit extends Cubit<SignInState> {
  SignInCubit() : super(SignInState.initial());


  Future<void> signIn() async {
   // implementation
  }
}
First, we’re defining our presentation events:
sealed class AuthPresentationEvent {}

class InvalidCredentials implements BlocPresentationEvent {}

class NoConnection implements BlocPresentationEvent {}
Then, we have to mix BlocPresentationMixin with our cubit:
class SignInCubit extends Cubit<SignInState>
	with BlocPresentationMixin<SignInState, AuthPresentationEvent> {
  // implementation
}
Now, we can use the emitPresentation() method in our SignInCubit:
Future<void> signIn() async {
  try {
    // authenticate
  } on InvalidCredentialsException catch (err) {
    emitPresentation(InvalidCredentials());
  } on SocketException catch (err) {
    emitPresentation(NoConnection());
  }
}
We’re done with the business part. Now, onto the fun things: let’s update the UI. Similar to how there’s BlocListener, there’s also BlocPresentationListener:
// in the sign in screen widget

@override
Widget build(BuildContext context) {
  return Scaffold(
    body: BlocPresentationListener<SignInCubit, AuthPresentationEvent>(
      listener: (context, event) => switch (event) {
          InvalidCredentials _ => ScaffoldMessenger.of(context)
            ..hideCurrentSnackBar()
            ..showSnackBar(
              const SnackBar(content: Text('Invalid credentials')),
            ),
          NoConnection _ => ScaffoldMessenger.of(context)
            ..hideCurrentSnackBar()
            ..showSnackBar(
              const SnackBar(content: Text('No internet connection')),
            ),
        },
      child: LoginForm(),
    ),
  );
}
4. Package dashed_line
The dashed_line package lets you easily draw dashed lines.
Problem
No surprise here: in one of the projects, we had to draw a dashed line, and we haven’t found any good packages for doing that. Then we wrote our own!
Solution
The dashed_line package provides the DashedLine widget. You give it a path, and DashedLine draws it but dashed. You can also customize a few aspects of the dashed line, such as the segment’s length, the gap between segments, or the cap style.
Let’s see some code. Here’s how you’d draw a very simple dashed line:
// in some widget
@override
Widget build(BuildContext context) {
  final path = Path()..cubicTo(-40, 53, 14, 86, 61, 102);
  return Scaffold(
    appBar: AppBar(
      title: const Text('dashed_line package'),
    ),
    body: DashedLine(
      path: path,
      color: Colors.black,
    ),
  );
}
Here’s how it’d look like:

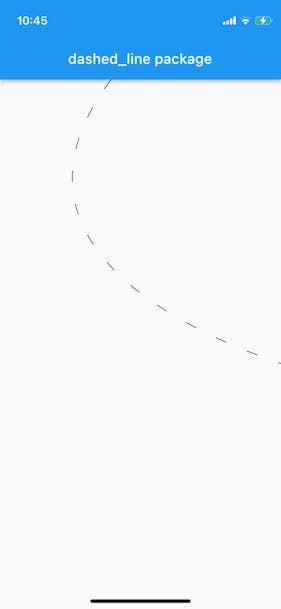
@override
Widget build(BuildContext context) {
  final path = Path()..cubicTo(-40, 53, 14, 86, 61, 102);
  return Scaffold(
    appBar: AppBar(
      title: const Text('dashed_line package'),
    ),
    body: DashedLine(
      path: path,
      width: 20,
      dashSpace: 20,
      dashCap: StrokeCap.round,
      color: Colors.blue,
    ),
  );
}
And that’s it! “Do one thing and do it well” in its purest form – peak Unix philosophy.
By the way, if you’re wondering where we got the path values from: it’s just some pretty nice math. If you’d like to learn more about that math, do check out this great video.
5. Package sorted
The sorted package makes advanced sorting simple.
Problem
Sorting is a very common operation. Dart, being the convenient language it is, provides us with the sort() method that works for simple cases, like a list of strings:
void main() {
  final names = ['Jane', 'Ann', 'John', 'Bart', 'John', 'Zoe'];
  names.sort();
  print(names); // [Ann, Bart, Jane, John, John, Zoe]
}
What if our list of names was a list of people, and we wanted to sort the people by their last names? We should use the sortBy() method provided by the collection package.
class Person {
  const Person(this.firstName, this.lastName);

  final String firstName;
  final String lastName;

  @override
  String toString() => '$firstName $lastName';
}

void main() {
  final people = [
    Person('Jane', 'Appleseed'),
    Person('Ann', 'Doe'),
    Person('John', 'Appleseed'),
    Person('Bart', 'Appleseed'),
    Person('John', 'Doe'),
    Person('Zoe', 'Dashbird'),
  ];

  people.sortBy((person) => person.lastName);
  print(people); // [Jane Appleseed, John Appleseed, Bart Appleseed, Zoe Dashbird, Ann Doe, John Doe]
}
Now let’s complicate things even more – we want to sort the list by the person’s last name and then sort by the first name. This isn’t easily achievable, even with the collection package.
Solution
sorted is a small library that provides a single extension method - sorted(). It accepts your iterable and an arbitrary number of SortedRules, which makes it very easy to express complex sorting rules.
That’s how we could sort the people list by the person’s last name and then by the person’s last name with the sorted package:
final people = [
  Person('Jane', 'Appleseed'),
  Person('Ann', 'Doe'),
  Person('John', 'Appleseed'),
  Person('Bart', 'Appleseed'),
  Person('John', 'Doe'),
  Person('Zoe', 'Dashbird'),
];

final sortedPeople = people.sorted(
  [
    SortedComparable<Person, String>((person) => person.lastName),
    SortedComparable<Person, String>((person) => person.firstName),
  ],
);

print(sortedPeople);
The sorted package can handle much more than we’ve shown with this simple example, so do check it out!
6. Package patrol_finders
The patrol_finders package makes it easy to write clean and robust widget tests.
You’ve probably heard about Patrol – a powerful UI testing framework made by LeanCode.
Patrol shines when doing integration testing, but in smaller projects, there’s often no time to write them and, let’s face it, no money to execute them regularly on CI. An interesting alternative in such a case can be writing widget tests – to test only a critical part of the app’s UI, with external dependencies mocked.
If you’re only writing widget tests, you can still use the default patrol plugin, but did you know that there’s a leaner, more lightweight alternative? Welcome to the patrol_finders package!
Problem
We all know and love the default flutter_test package, but its API is a bit verbose. Let’s see a sample login screen test:
testWidgets('signs up', (WidgetTester tester) async {
  await tester.pumpWidget(ExampleApp());
  await tester.pumpAndSettle();
  await tester.enterText(
    find.byKey(Key('emailTextField')),
    'charlie@root.me',
  );
  await tester.pumpAndSettle();
  await tester.enterText(
    find.byKey(Key('nameTextField')),
    'Charlie',
  );
  await tester.pumpAndSettle();
  await tester.enterText(
 	find.byKey(Key('passwordTextField')),
    'ny4ncat',
  );
  await tester.pumpAndSettle();
  await tester.tap(find.byKey(Key('termsCheckbox')));
  await tester.pumpAndSettle();
  await tester.tap(find.byKey(Key('signUpButton')));
  await tester.pumpAndSettle();
  expect(find.text('Welcome, Charlie!'), findsOneWidget);
});
This is a really simple test, but it’s not that short. It’s also annoying to have to write all those pumpAndSettle()s manually.
Solution
Patrol’s custom finders enable you to quickly write shorter tests that read almost like an English sentence:
import 'package:patrol_finders/patrol_finders.dart';

patrolWidgetTest('signs up', (PatrolTester $) async {
  await $.pumpWidgetAndSettle(ExampleApp());
  await $(#emailTextField).enterText('charlie@root.me');
  await $(#nameTextField).enterText('Charlie');
  await $(#passwordTextField).enterText('ny4ncat');
  await $(#termsCheckbox).tap();
  await $(#signUpButton).tap();
  await $('Welcome, Charlie!').waitUntilVisible();
});
Custom finders were an integral part of the patrol plugin in the past, but since release, we’ve received a lot of feedback from our users. One of the most requested changes came from the users who weren’t using Patrol’s native automation feature – because they weren’t writing integration tests. They were asking us to separate custom finders into a separate package so they could use just them without pulling the native dependencies of the full patrol plugin – and that’s how patrol_finders was born.
Try these Flutter and Dart top packages!
So that’s it! We hope you liked our 6 non-obvious Dart and Flutter packages. We wanted to share them with you because we think it might improve your work on Flutter mobile app development. We encourage you to give them a try in your projects as well. All of the packages we mentioned are open-source and actively maintained since we use them in LeanCode’s Flutter projects. We’d love to hear from you if you have any tips or questions!
If you are looking for a package for testing Flutter apps, then you should try out our open-source Patrol UI testing framework.


Read more

Meet Patrol: Our open-source solution for app testing
Big announcement! LeanCode is open-sourcing Patrol – a new Flutter-first UI testing framework that revolutionizes the way we test our Flutter apps. Patrol is written in Dart, which makes it familiar to all Flutter developers. Check out what it can do so far.

How to Limit a Video Upload to a Specific Time Frame?
One of the projects we delivered at LeanCode was building an application for Healthcare Industry - Quittercheck. While developing the app, the problem we faced was how to limit a video upload to a specific time frame. Read about our tailored solution to this challenge.

Improving Your Code With Dart Code Metrics
Dmitry Zhifarsky, during Flutter Warsaw #16, talked about Dart Code Metrics features and explained how they could help you become a more efficient Dart and Flutter Developer. Find out more about this static analysis tool by watching the video and reading participants' questions.